Project {Bathroom}…still in progress

Well Part 1 of Project {Bathroom} has been completed. The easy part, or I should say the easy for us part, is over. We had Luxury Bath our of Rochester come in and do a tub liner, new shower walls, new faucet, shower head, etc, new flooring, and install the new vanity and sink that we bought from Ikea. It wasn’t exactly easy for the installer, we just had to cut the check.

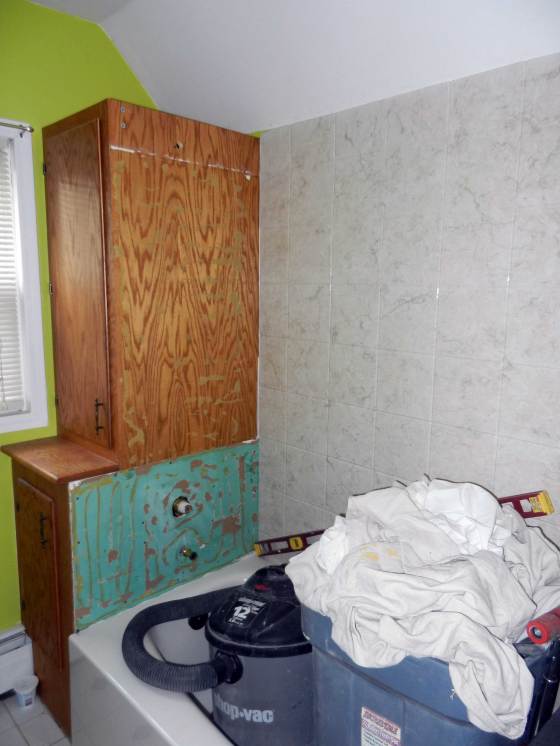
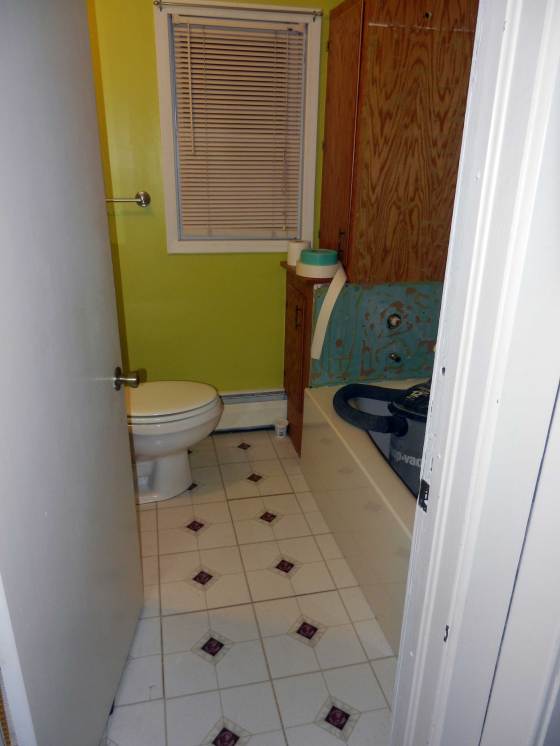
They’ve been done for a while now but I’ve been slow to pick up where they left off and get the rest of the bathroom done. The only thing I’ve managed to do since is admire how awesome our new shower is, get some new storage baskets for our linen closet and re organize it.

Maybe if I make myself a list that will get my butt in gear to get some of these things done.

• Pick out and instal new bathroom light.
• Finish sanding and mudding (NO! Not more mudding and sanding!) the wall where the old vanity was.
• Prime and paint.
• New trim work along floor and door (this could be tricky).
• New curtain/shade for the window.
• Extra bathroom storage? We lost counter space when we replaced the vanity. I thought I would miss it but turns out I don’t. We might put Ikea spice racks (idea I saw on Pinterest) on the wall to store hair products and stuff but I’m not if we need to do that now or not.
• Instal new toilet paper holder. We also lost our toilet paper holder when the vanity was removed. But hey, when you don’t have a holder there is no more annoyance when someone (usually me) fails to replace the old roll with a new one.
• Think about the linen cabinet that we have in the bathroom and if we want to stain it a dark espresso color to match our new vanity. Right now it is a honey oak color and it doesn’t look bad. It just might look better in a dark espresso color. At first when Mark suggested it I was afraid of how much work it was going to be. I had also heard that the darker the stain the harder it is to get it to come out the way you want. But then I found this blog post and it looks like it could be doable. But now I wonder if its too late to do that since our tub buts up against the cabinet, they had to do some fancy trim work around it. I’m not sure how easy it will be to stain around it and if it would turn out and not ruin the trim and caulk they used. Something else to think about.

I think that is about it. Maybe this weekends tasks should include a trip to Lowes to get the new bathroom light fixture, and pick out some paint (oh and a toilet paper holder too). That doesn’t sound too difficult. Maybe even get the sanding on the wall done…if I get that done, that’ll be a bonus though. 😉

Project {Bathroom} pt1

Alright, well I forgot to take pictures before they started tearing apart our bathroom but our bathroom remodel project is underway! We decided to not DIY for this project. Since moving in we knew we wanted to do something different with the bathroom. Here it is as it was on our closing day:

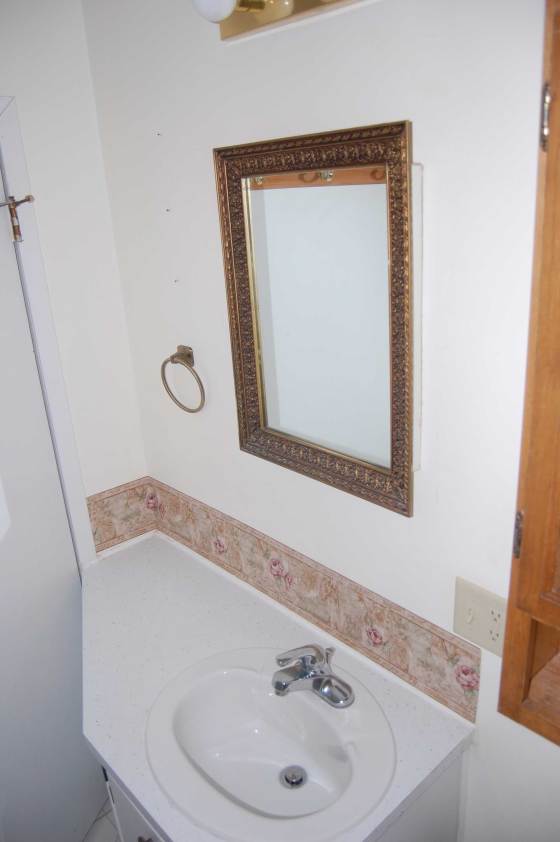
It’s a rather odd space to photograph. I’ll have to get creative for the after shots. But here is the odd shaped vanity, lovely wallpaper, gold ornate medicine cabinet and part of the big cabinet that sat over the toilet. You can see where the door can’t open all the way because of the sink cabinet but they tried to do their best and use the space for storage. But to be honest when we moved in the cabinet was pretty rough and I never used it more for than just cleaning storage.

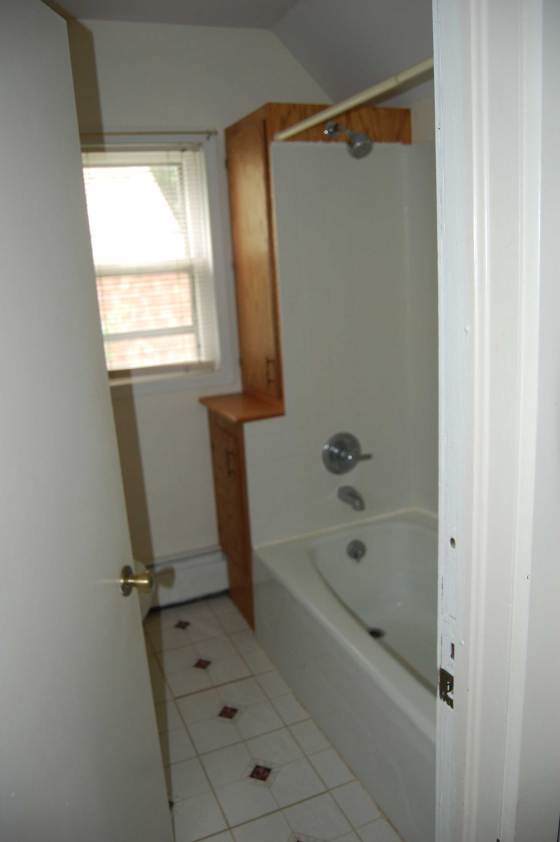
And apparently I couldn’t focus my camera that day. But you can kind of see the old tub and shower walls and stylish peel and stick floor squares they installed crookedly. Oh hey, you can even still see the bad caulking job they did between the tub and the walls and again at the top of the shower walls. The door is about as far at it will open in this pic because of the sink behind it.

So right when we moved in we removed the wallpaper boarder by the sink (uncovered some more bad caulk jobs), removed both the medicine cabinet and the wood one that sat over the toilet and repainted the walls. Small steps to make it livable till we decided what to do with in. We knew we wanted to do something different with the sink and probably new floors we just weren’t sure when. We talked about doing it ourselves but we were a little apprehensive over tackling those things ourselves. While we were at the home show in town this spring we came across a company out of Rochester that specializes in bathroom makeovers. They keep your existing tub and do a molded liner for it and this fancy dancy new shower wall system. Everything is old/mildew/germ resistant, we were sold!

They came out to our house and we picked out tub color (biscuit) and shower wall color, pattern, and texture (Sierra Sand in a 8 inch square pattern) and faucets and shower heads. We were even able to go to a Carpet One store and pick out a new vinyl floor that they’ll install. For the cabinet and sink they didn’t really have what we were looking for but they have been really flexible and let us pick something different out and purchase it and they’ll do the install for us after they do the floor. We had our eye on something from Ikea. Bless the Sweeds. I think we saved a ton of money going that rout too.

No after pictures yet, they just came today and tore out the sink and cabinet and put in the tub liner and a shower wall. But I did take some during shots:

Where the sink used to be. I guess they put sheetrock up around the existing cabinet so the poor guy has some patching work to do tomorrow over the crumbling plaster in the corner that is now going to be empty since our new sink/cabinet combo takes up a lot less space. You can see the mirror that we put up to replace the gold medicine cabinet.

And there is one of our new shower walls and the new tub liner. Tomorrow the other two walls will go up and new faucet and shower head will come.

And a little better shot of the floor before it gets tore up/covered up tomorrow. That’s probably the widest the door has been open for decades!

Yeah, we went a little crazy with the alien green when we first moved in. It doesn’t quite match the new shower curtain set we got for our wedding so we’ll be repainting once everything is done. We are actually thinking about using the rest of the paint we had from the mudroom project. What do you think?

Project {Mud Room}

It has been just about two years now since we bought our house in 2010. We moved in, and did a lot of work right away to make the home more “us”. Once we got that out of our system, we got engaged, then we got flooded, we did some wedding planning, and then we got flooded again in June of 2011. By this time all house projects were on hold, my brain was filled with wedding planning and wedding projects. I assured Mark we would get back to house projects once we were able to wind down from the wedding. By the time we got back from our honeymoon to Mexico in February, I was thoroughly relaxed and ready to face the house. We had a list in mind of things we’d like to get done. Especially if we were going to be having Family Thanksgiving 2012 at our house. We just didn’t know where to start.

In March we went to Ikea for my Birthday to look for a few things to add to our house. Initially it was just going to look for a side table/banquet/bar type thing for our dinning room. We did find what we were looking for but of course, it’s Ikea, and we also found a shoe cabinet that we really liked. That would go well in our mud room we thought innocently.

By the end of the day with what started with an innocent shoe cabinet turned into a complete mud room renovation. Here is a picture of what it looked like in 2010, the day we signed the papers and got the keys to our house:

At first glance, not horrible, right?

Here’s the mud room two yeas later. Carpet? Not a good idea for an entryway/mud room of any kind. (This was taken after we started taking things apart and after we cleared out all of the stuff we accumulated in there.)

What started with a shoe cabinet to wrangle the dozens of shoes we have between the two of us turned to: well why don’t we do something different to the floor? Mark suggested the laminate floor that looked like ceramic tile and I was sold. It’s a small space, it wouldn’t take much to cover the floor. Oo, and we should paint and do a different wall color! Weekend project, easy enough! HA!

We get home from our Ikea trip and check out the room more closely. Wow, what did they do to these walls? Or what didn’t they do? It looks like they just put up some paneling but didn’t finish the corners or seams. They just added really cheap white trim to the corners (see first picture) to make it look more finished. So we figured we’d put a little more work into the room and take all the trim down and actually do some tapping, mudding, and sanding to make it look complete. Plus we had to remove the hooks they had installed so that left big holes (to accompany the ones that were already there) so we’d have to do some filling before we painted anyways.

This is after our introduction to tapping, mudding  and sanding. Not sure I want to do that ever again.

Then we primed, and painted and we got a closer look at the ceiling tile and decided we might as well replace that too, along with the dated light fixture. And curtains! We need new window treatments! Should I remind you, again, that this started with just a shoe cabinet?

One of my favorite things about doing these kinds of projects is uncovering hidden treasures like this: The 60’s linoleum floor that was under the carpet. Ack!

Mark’s parents and brother, Mike came down to help us with the floor and trim work. I’m sure it would have taken Mark and I at least twice as long to finish the project on our own. They finished up the trim work this last weekend and Mark and I finished putting in the new drop ceiling tiles last night. Oh, I also ended up adding a couple of coats of  white paint to the rails of the ceiling. the new bright white tiles made the rust stick out on the old ones like a sore thumb.

So finally! After a month and a half, IT’S DONE!

Yup, we went green. What can I say, we love color.
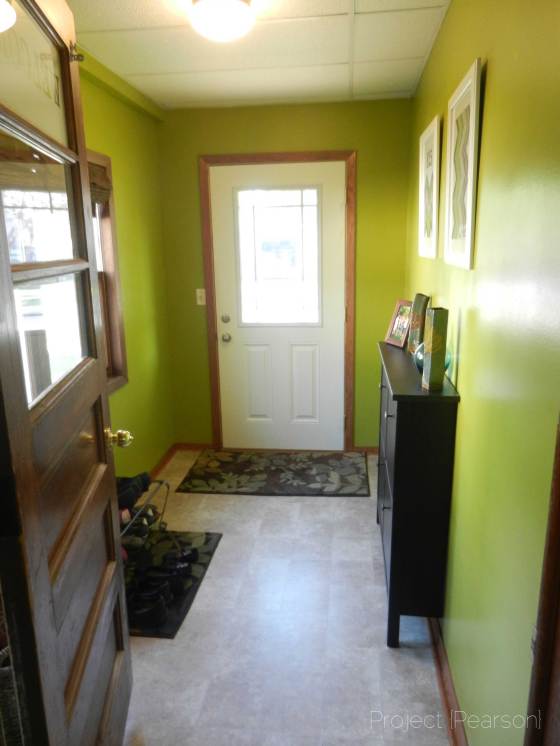
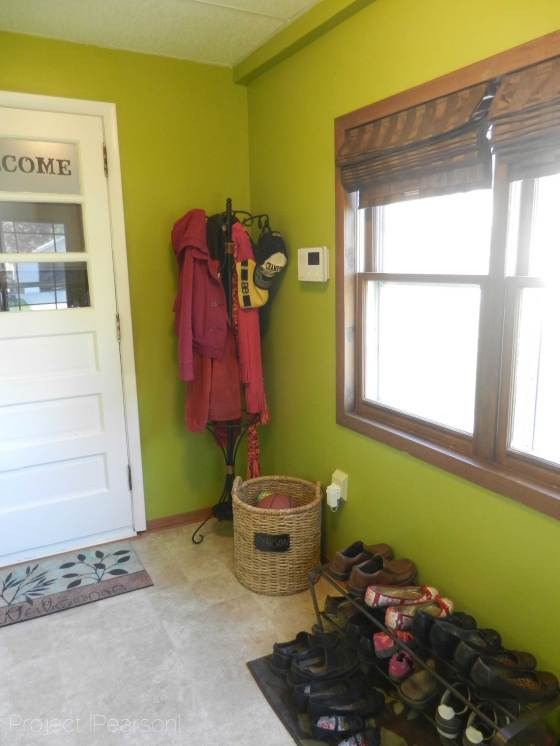
I also did a fresh coat of white paint to the interior door and door frame. This door leads to to our kitchen. I also added some frosted window film to the top window pane and used some letters I cut using my Cricut Storybook cartridge as a template to cut away the word welcome in the frosted window film.

Other side of the mud room. We still had too many shoes so we added a shoe rack for the shoes we use most often. We also brought our coat rack back into the room and you can see our new roman shades for the windows. We found them at Lowes and I love them!
Shoe cabinet in action.

And the framed art I did for the walls to break up the green. Established in 1912. Happy 100th Birthday, house!

New ceiling and light. Ooooo….Ahhhh….

And a bigger shot of the new floor. Looks like ceramic tile doesn’t it?

Whew, glad that’s over! Up next? Well, a plumber is coming out this week to put in not one but two sewer backup valves in our main sewage line in the house. No more flash-flood-storm-water flooding our basement again! Don’t worry, I won’t include photos of that process. Although it would be interesting to see him in our basement with a jackhammer breaking up our floor to get to the sewer line.  On second thought, I got nervous enough when they were putting in the floor and back when they were installing our new countertop during the kitchen remodel. I think I’m going to be glad I’ll be at work during that project.

After that we’ve hired Luxury Bath out of Rochester to come and redo our bathroom. That’ll be coming in the next month or so. I’m ready to take a break from major renovations for now, I’m glad we hired that project out. 😉
 

Project {Wordle}

I’m a sentimental fool. I can’t bring myself to get rid of anything from the wedding. If we hadn’t sold the collection of milk glass we had collected for our center pieces to our florist, I probably would have those packed away as well. Need a few dozen black new years top hats? Got em! Plastic frames the perfect size of a photo strip frame? Got a few dozen extra of those too!

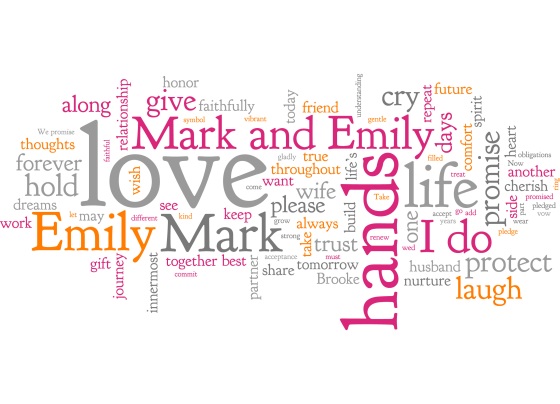
One of my favorite nerdy/crafty bloggers, Epbot, gave me the idea to use Wordle to create a word cloud from our wedding vows and first dance song.

Here is the one that I created of our vows that we said to each other. I added a few other words and repeated some that I wanted to stand out more. The more a word is repeated in the text you select, the bigger it will be in your word cloud. Wordle has lots of options so you can customize it to make it your own; you can choose your own colors, fonts, and layout styles. I had to go with our wedding colors; pink, orange, and charcoal.

And then here is the one I did from the song we had our first dance to, Tangled Up In You by Aaron Lewis.

You can save your word cloud to a public gallery to go back to later, or you can also print your creation. I think I might need make a few prints to frame for our house. Creating one of these would also make a special anniversary present for a couple.

Project {Blog}

Here it is, another attempt at blogging. Previous attempts include; The Single Sister, and The Single Sister Gets Married. Of course Single Sister wasn’t going to work now that this sister is no longer single. And my attempts at keeping Gets Married up to date failed miserably. How I thought I was going to keep up a blog while planning and crafting my way through two weddings within two months of each other is beyond me.

So now that the weddings are over, we’ve settled into married life and started embarking on a few house projects I thought it was time to try this again. This time with a new blog name, Project Pearson, and a new venue, word press.

I hope to update everyone on the house projects we are doing, the goings on of the three year old in our life Brooke, look back and some of the things we did for the weddings, and anything else that may be of interest.